

Features & Usage
Main Features
Advanced Upgrades
Tip: You can search for Config.AdvancedUpgrades in configs/config_prices.lua to quickly locate all related settings.
What are advanced upgrades?
Advanced upgrades are special mechanic-installed performance parts that go beyond normal customs upgrades.
Unlike standard upgrades, these use physical items and tools, and must be fitted by a mechanic. They are designed for bigger performance changes, such as improving braking, grip, drivetrain type, engine power, or transmission response.
Once installed, an advanced upgrade changes the vehicle’s handling values and stays with that vehicle until it is removed or replaced.
Installation Process (Player)
- Open the customs UI at a mechanic location
- Select and purchase an advanced upgrade
- A service order is created for a mechanic
- Wait for a mechanic to accept and complete the job
- Once installed, the vehicle receives the upgrade and handling changes
Installation Process (Mechanic)
- Use the mechanic tablet to open the Work Orders app and accept the order
- This advanced upgrade item needs to be in your business inventory, if you don’t have one, you can craft it
- You may need a work tool like an engine lift, transmission lift, or impact driver in your inventory to start the upgrade
- Follow the instructions to complete the upgrade
Business Upgrades
Tip: You can search for Config.BusinessUpgrades in configs/config.lua to quickly locate all related settings.
Purchase upgrades in Business App > Upgrades on the tablet.
Some upgrades are required to use certain features, such as crafting locations and tools like the impact driver, which must be in your inventory to perform specific upgrades.
Key Points & Features
- Locations and car lifts must be placed using the Shop Layout tab
- Tools degrade over time and will need to be replaced
- All upgrades are purchased using business society funds
Locations & Features
- Crafting – Unlocks a crafting location
- Inventory – Unlocks an inventory location
- Crafting Upgrade – Increases crafting capacity
Equipment
- Car Lift – Required for advanced upgrades
Tools
- Impact Driver – Required for basic upgrades
- Spray Gun – Required for respraying vehicles
- Engine Lift – Required for advanced upgrades
- Transmission Lift – Required for advanced upgrades
- Car Jack – Required for roadside tyre repairs
Crafting
The crafting system allows mechanics to create vehicle parts, tools, and usable items required for upgrades or sale. It is fully configurable and integrates with the mechanic business inventory, ensuring all materials and crafted items are managed within the system.
Key Points & Features
- Can be disabled to allow use of your own crafting system
- Each craftable item can be individually enabled or disabled in the config
- Required crafting materials are configurable in
config.luaandconfig_prices.lua - Can be used to craft vehicle parts, mechanic tools, and usable items for sale
- All materials must be stored in the mechanic business inventory before crafting
- Once crafting has started, you do not need to remain nearby; as a result, crafting times are longer.
- Crafted items are automatically added back into the mechanic business inventory
Mechanic Business Inventory
What Is the Mechanic Business Inventory?
The mechanic business inventory is a custom-built storage system designed specifically for mechanic-related items. It operates independently from your main inventory or framework system and is required for storing all crafting materials and vehicle parts used in upgrades.
Key Points & Features
- Must be purchased via the Business Upgrades app before use
- Requires placement after purchase (see Business Upgrades section)
- You can purchase and place multiple inventory locations
- Separate from your personal inventory and server/framework inventory systems
- Only accepts mechanic-related items (e.g., parts, tools, crafting materials)
- Non-mechanic items cannot be stored in this inventory
- Crafted items are automatically added to the business inventory
- Materials and parts must be stored in this inventory to perform upgrades
- Used for both basic and advanced vehicle upgrades
Mileage
- Mileage is saved per vehicle in
owned_vehicles/player_vehicles. - Parts degrade based on mileage, reducing health and causing negative performance effects.
Parts Degradation
Tip: You can search for Config.PartsDegradation in configs/config_prices.lua to quickly locate all related settings.
What is Parts Degradation?
Parts Degradation gradually reduces the health of serviceable vehicle components, applying negative tuning effects and potentially causing catastrophic failures when a part is fully worn.
- Parts degradation can be fully configured in
config_prices.lua - Parts degrade over time from mileage, vehicle damage, and aggressive tuning
- As parts wear, their health decreases and negative tuning effects are applied
- Severely worn parts significantly reduce performance and reliability
- At 0 health, parts can cause major failures while driving
- Parts can be repaired using the Service App on the mechanic tablet
Service
The service app repairs degraded serviceable parts, restoring their health and removing negative tuning effects, while also repairing engine and body health.
How It Works
- Mechanic opens the service app on mechanic tablet.
- Mechanic selects the parts to repair based on the customer’s request
- The script calculates:
- The cost to the customer
- The parts required from the mechanic
- The player is charged and the money is held securely in escrow until the job is complete
- A work order is created and required parts are taken from the mechanic’s inventory
- Once the job is completed:
- The money is paid to the business (society account)
- If the job is cancelled:
- Parts are returned to the mechanic
- The player is refunded
Public LS Customs
Instant vehicle upgrades with no mechanic or player interaction required, with costs depending on the configured price multiplier.
Key Points & Features
- Created in-game through the Admin App
- Each location can be individually configured after creation
- Supports custom price multipliers per location
- Allows admins to set higher prices compared to player-run mechanic businesses
- All location data and settings are saved in the database
Secondary Features
Car Lift
- Must be purchased via Business App > Upgrades
- Requires placement using Business App > Shop Layout
- Can be interacted with by approaching and pressing E
Chameleon Paint
What is Chameleon Paint on Vehicles?
A special paint finish that changes colour depending on lighting and viewing angle.
Why is framework compatibility required for Chameleon Paint?
Most default frameworks do not support saving or applying chameleon paint colours by default. This compatibility setup is required if you want vehicles to properly save, load, and display chameleon paint colours.
Find the GetVehicleProperties function in your framework files (location may vary depending on your framework version), as shown in the image below.
ESX es_extended/client/functions around line 807
QBCore qbcore/client/functions around line 405
QBox ox_lib/resource/vehicleProperties/client around line 140
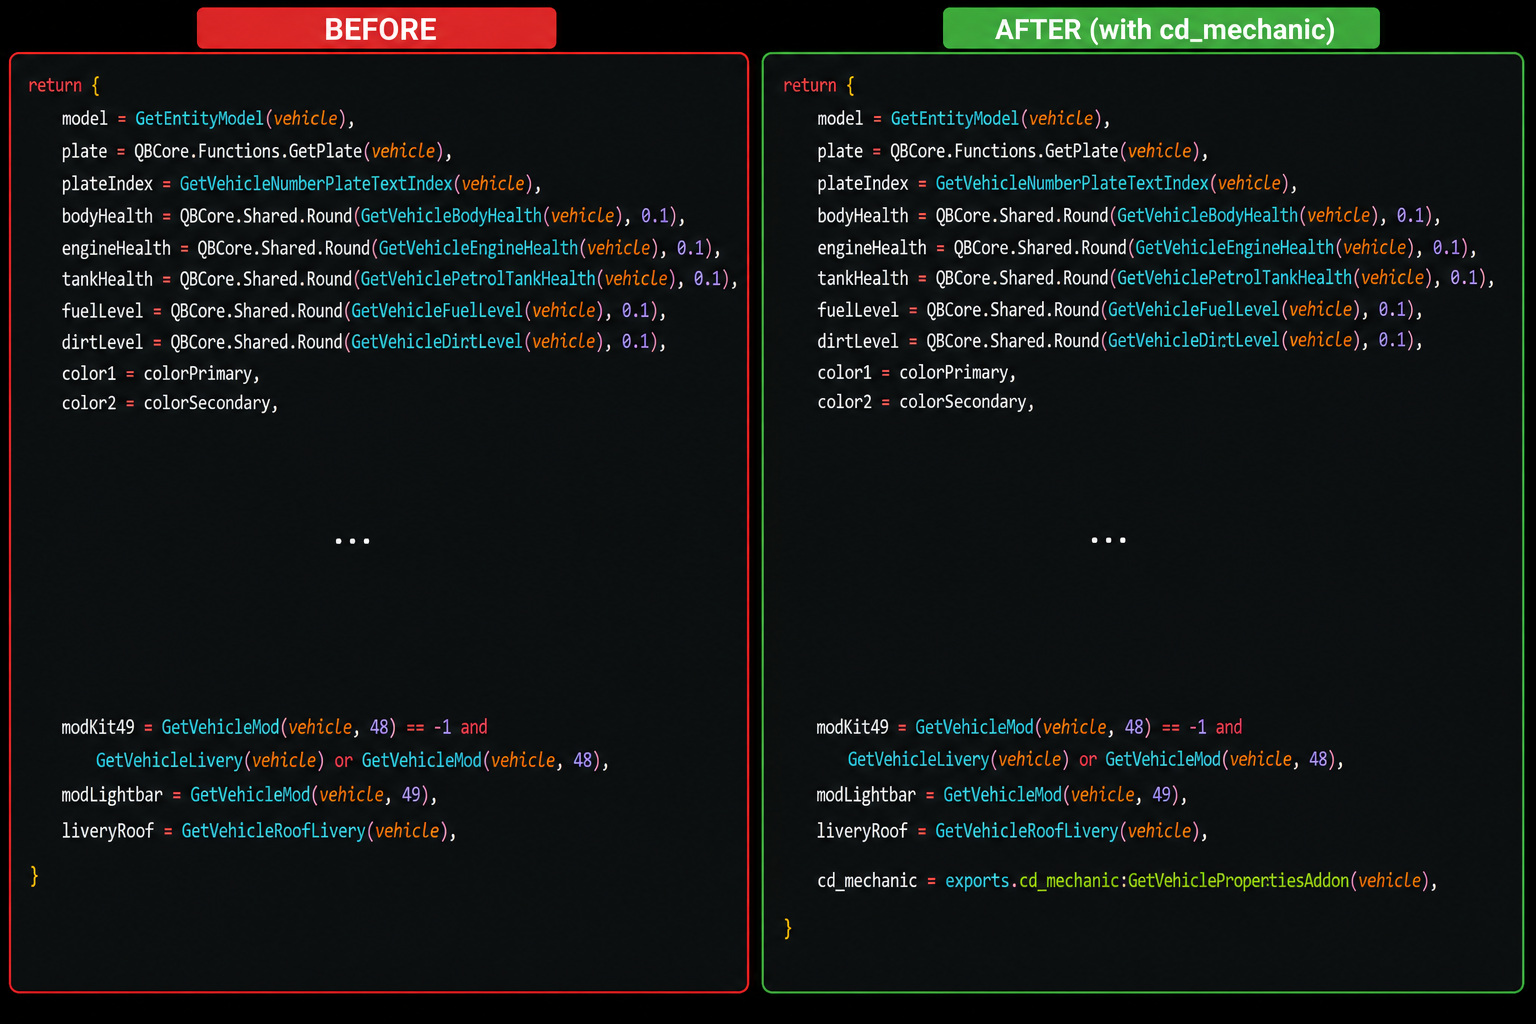
The image above is an ESX example; QBCore and QBox will look slightly different.
Add the following line to the returned properties table. It does not matter exactly where it is placed, as long as it is inside the return {} table:
cd_mechanic = exports.cd_mechanic:GetVehiclePropertiesAddon(vehicle),Find the SetVehicleProperties function in your framework files (location may vary depending on your framework version), as shown in the image below.
ESX es_extended/client/functions around line 961
QBCore qbcore/client/functions around line 560
QBox ox_lib/resource/vehicleProperties/client around line 302
.png)
The image above is an ESX example; QBCore and QBox will look slightly different.
Add the following code at the very bottom of the SetVehicleProperties function. This must be placed at the bottom of the function to ensure cd_mechanic vehicle data is applied after all framework vehicle properties:
if props.cd_mechanic then
        exports.cd_mechanic:SetVehiclePropertiesAddon(vehicle, props.cd_mechanic)
    end
Headlights & Neons
Tip: You can search for Config.HeadlightsNeons in configs/config.lua to quickly locate all related settings.
The headlights and neons system allows players to customize vehicle lighting using the Lighting Controller, enabling color and style adjustments with full synchronization and persistent data storage.
Key Points & Features
- Default item setup can be found in the #player-usable-items
- Uses the Lighting Controller usable item to open the UI
- Neons require purchase before use; headlights are available by default.
- All lighting data is saved in the database and persists until changed or removed
- Fully synchronized across all players
OBD Scanner
Tip: You can search for Config.ObdScanner in configs/config.lua to quickly locate all related settings.
What is the OBD Scanner?
The OBD Scanner is a diagnostic tool that allows players to check a vehicle for critical issues, helping identify severely worn or failing serviceable parts.
Key Points & Features
- Default item setup can be found in the #player-usable-items
- Crafted by mechanics and can be sold to the public
- Use the OBD Scanner while seated inside a vehicle
- Neons require purchase before use; headlights are available by default.
- All lighting data is saved in the database and persists until changed or removed
- Fully synchronized across all players
Stancer
Tip: You can search for Config.Stancer in configs/config.lua to quickly locate all related settings.
What is a stancer?
A stancer is a tuning tool that allows you to adjust a vehicle’s suspension stance, including wheel offset, camber, and ride height. It is primarily used for visual customization, giving vehicles a more aggressive or lowered appearance.
Key Points & Features
- Default item setup can be found in the #player-usable-items
- Uses the Stancer usable item to open the UI
- All stance data is saved in the database and persists until changed or removed
- Fully synchronized across all players