Installation Guide
1. Codesign Bridge
This script requires cd_bridge to be installed and running before it can function
cd_bridge is plug-and-play and requires no setup. It automatically handles:
- Framework integration
- Database setup
- Script compatibility
- Error Handling
Once started, it will detect and connect to all supported scripts automatically.
2. Download Script
Download the Script from the FiveM Portal Website
- Download cd_dispatch3d
- Unzip the downloaded file
- In your server's
resourcesdirectory, create a folder named[codesign]if it does not already exist - Place
cd_dispatch3d(and all other Codesign scripts) inside the[codesign]folder
.png)
Example resources folder with a [codesign] directory
3. Database Setup (SQL)
No manual SQL setup required.
The script automatically inserts all required database tables.
Config.AutoInsertSQL = trueMake sure this is enabled in cd_dispatch3d/configs/config.lua.
4. Configure Script
Review the config.lua Settings
Open cd_dispatch3d/configs/config.lua and check the available settings.
- Update the options that are needed for your server.
- Read the comments next to each option, as they explain what each setting does.
5. Configure Key Binds
Configure Before Starting the Resource
Before Starting the Resource
- Before launching this resource on your main or live server, we strongly recommend configuring your key binds first.
- This resource uses FiveM's Key Mapping system.
Where Can I Configure My Key Binds?
- You can configure all key binds directly in
cd_dispatch3d/configs/config.lua.
Why Is This Important?
- Once a player joins your server with this resource running, you can no longer force key bind changes through the config file.
- Players must adjust their key binds manually through the in-game pause menu settings.
- Any changes you make will still apply to new players who join afterward.
- This system is more optimized and gives players the flexibility to customize their key binds for both keyboard and controller use.
- You can also review the Default key Binds binds provided with this resource.
.png)
Keybind settings located in the pause menu
6. Replace Old Dispatch Alerts
Notice
Not all dispatch alerts need to be replaced.
cd_dispatch3d now supports the following without any changes:
cd_dispatch(classic)ps-dispatchlb-tabletredutzu-mdt- Default ESX police alerts
- Default QBCore police alerts
Only replace alerts if you are using a custom or unsupported police alert system.
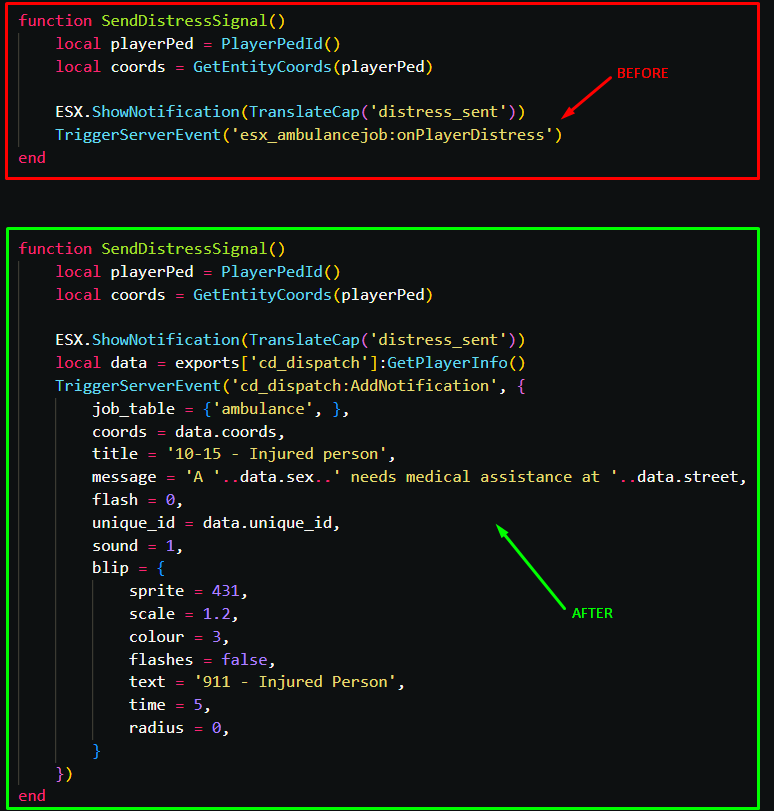
Find the old alert
- Red Old dispatch alert
- Green Old alert replaced with
cd_dispatch3d
Not every resource will look the same, but the implementation concept remains identical.
Having trouble finding the old alert?
Trigger the Alert Where the Action Starts!
Dispatch alerts should be triggered where the event begins, for example:
- When the robbery starts
- When a crime is committed
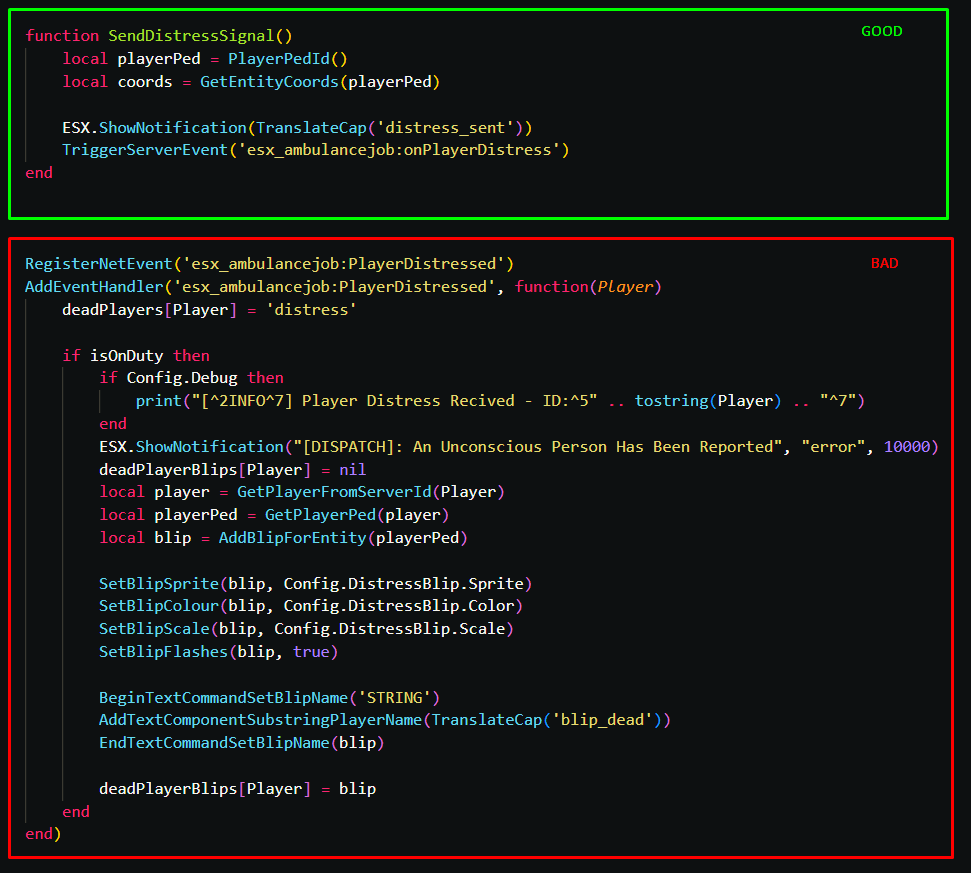
Bad Practice
Triggering alerts inside an event that already broadcasts to all police:
- Causes duplicate notifications
- Creates duplicate blips
- Results in dispatch spam
Good Practice
Trigger the alert:
- At the source of the action
- Before any police broadcast or blip creation
- Let
cd_dispatch3dhandle visibility and syncing
Once you've found the old dispatch alert to replace, continue with Step 7.
7. Add New Dispatch Alerts
Compatible Integrations by Codesign
On our Resource Integration page, you can find a full list of pre-integrated and compatible scripts that work seamlessly with cd_dispatch3d and MDT integrations.
View the full list of compatible scripts
local data = exports['cd_dispatch3d']:GetPlayerInfo()
TriggerServerEvent('cd_dispatch:AddNotification', {
    job_table = { 'police', 'sheriff' },
    coords    = data.coords,
    title     = '10-15 - Store Robbery',
    message   = 'A ' ..data.sex.. ' robbing a store at ' ..data.street,
    flash     = false,
    sound     = 1,
    blip = {
        sprite  = 431,
        scale   = 1.2,
        colour  = 3,
        flashes = false,
        text    = '911 - Store Robbery',
        time    = 5,
        radius  = 0,
    }
})TriggerEvent('cd_dispatch:AddNotification', {
job_table = { 'police', 'sheriff' },
coords = vector3(0, 0, 0),
title = '10-15 - Store Robbery',
message = 'A person robbing a store',
flash = 0,
sound = 1,
blip = {
sprite = 431,
scale = 1.2,
colour = 3,
flashes = false,
text = '911 - Store Robbery',
time = 5,
radius = 0,
}
})Player Info Export Reference
The following export is used in the example above:
This data structure can be customized in: integrations/client/client_exports.lua
local data = exports['cd_dispatch3d']:GetPlayerInfo()
data.ped       -- Player ped ID (e.g., 123456789)
data.coords    -- Player coordinates (vector3)
data.street_1  -- Street name (e.g., "Palomino Ave")
data.street_2  -- Area name (e.g., "Legion Square")
data.street    -- Full location (e.g., "Palomino Ave, Legion Square")
data.sex       -- Ped sex (e.g., "Male")
Dispatch Alert Variable Reference
| Variable Name | Required | Example | Description |
|---|---|---|---|
| job_table | true | List of jobs that will receive the dispatch alert. | |
| coords | true | vec3(0.0, 0.0, 0.0) | World coordinates where the alert occurred. |
| title | true | '10-19 Robbery' | Title displayed in the dispatch UI, usually 10 codes. |
| message | true | 'Robbery in progress' | Main description shown to responders. |
| flash | false | true | Whether the alert flashes on the UI. (true/false) |
| sound | false | 1 | Dispatch alert sound.Editable in BlipSound() (client/other/functions.lua).1 = single alert, 2 = double alert, 3 = panic alert. |
| blip | false | Map blip configuration (see below). | |
| blip.sprite | false | 431 | GTA blip sprite ID - More here. |
| blip.scale | false | 1.2 | Blip size on the map: 0.1-2.0. |
| blip.colour | false | 3 | Blip color ID - More here at bottom. |
| blip.flashes | false | true | Whether the blip flashes. (true/false) |
| blip.time | false | 5 | Time until blip fades and deletes (minutes) |
| blip.radius | false | 0 | Randomize coords; use a radius blip.0 disables it, 50-100 recommended. |